User Tools
Sidebar
de:shortintroduction
This is an old revision of the document!
Table of Contents
 This page is not fully translated, yet. Please help completing the translation.
(remove this paragraph once the translation is finished)
Eine kurze Einführung für Autorinnen und Autoren
Zentraler Punkt unserer Publikationsstrategie ist ein einheitliches Format, welches derzeit auf LaTeX basiert. Dabei wird eine begrenzte Zahl an Befehlen verwendet, mit denen sich alle erforderlichen Bestandteile wissenschaftlicher Texte darstellen lassen. Um den Workflow zur Dokumenterstellung einfach zu halten, ist es wichtig, dass ein paar grundlegende Regeln befolgt werden. Nur so können die verschiedenen Formate aus einer Quelle leicht produziert werden.
Bevor wir fortfahren, laden Sie sich bitte die Software herunter, installieren Sie die erforderlichen Pakete und schauen sich das Beispielprojekt an. Die Links in der Seitenleiste helfen Ihnen beim Navigieren.
Erste Schritte
Wir unterstützen aktuell die Weitergabe der Version von 2013, die Sie aus dem Archiv herunterladen können. Zusätzlich benötigen Sie ein Editorprogramm, um mit LaTex Code arbeiten zu können. Wir Empfehlen die Nutzung von TeXShop für Apple Computer und TeXWorks für Windows.
Bitte beachten Sie, dass selbst erstellte LaTex-Makros nicht unterstützt werden. Die eigens für dieses System erstellten LaTex-Befehle gewährleisten größtmögliche Konsistenz and Konvertierbarkeit. Ohne diese Einschränkungen wäre es nicht möglich, die Publokationen in ePub und HTML Format zu konvertieren. Eine Liste der zulässigen Befehle finden Sie in diesem Dokument.
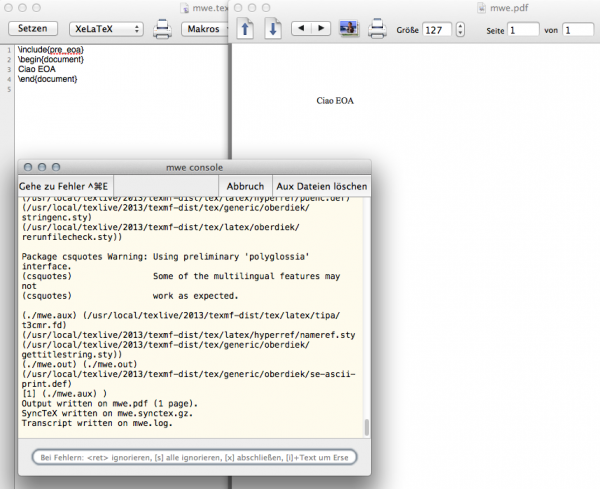
Für einen schnellen Start und um zu überprüfen, ob die LaTeX-Installation funktioniert, laden Sie die Präambel pre_eoa.tex herunter, starten Sie den LaTeX-Editor und fügen Sie den folgenden Code in das Fenster ein:
\include{pre_eoa}
\begin{document}
Ciao EOA
\end{document}
Speichern Sie diese Datei dort, wo Sie auch die Präambel platziert haben. Wählen in der oberen Menüleiste aus dem Dropdown-Menü XeLaTeX aus und klicken Sie auf Setzen. Wenn alles geklappt hat, sollten Sie zwei neue Fenster sehen: das Protokollfenster und das aus dem Setzen des Textes resultierte PDF. Sie können nun ein echtes Projekt starten und einrichten.
Setting up a project
Create a folder on your computer which will contain the data for the whole project. Download the preamble from this site (link top right). The preamble contains all the commands and layout definitions. All TeX files (including BibTeX files) should be placed in this single folder. Illustrations and graphics are best stored jointly in a subfolder called 'Images.'
File and directory names must begin with a letter and not include blanks, umlauts or other special characters (except hyphens and underscores).
The character encoding of the LaTeX file should always be UTF-8. Line breaks should be simple line feeds (LF) as is customary in Unix. This may necessitate a change in the standard settings of the editor.
The cited literature must be entered into a bibliographic database (e.g. BibDesk).
If illustrations and graphics are placed in a subfolder, the path has to be made explicit in the TeX file:
\EOAfigure{Images/Figure_1.png}{Caption}{Label}{99}{ht}
Each project consists of at least three files:
- The
pre_eoa.texfile contains the preferences, macros and packages defined for the purpose of the project and the text file. Generally, the preamble does not need to be changed by the authors. Individual requirements should be discussed with the Development Team. - The
biblio.bibfile exported from the bibliographic database. - The main file containing the text written by the author. In the case of edited books, this file may be divided into individual chapters. In order to generate a complete table of contents, the chapter titles and the names of the authors should be kept in the main file. The chapter files are inserted into the main file with the
\input{…}command.
Each main file begins with the commands
\include{pre_eoa}
\EOAbibliographytype{monograph}
\EOAbibliographydatabase{biblio}
\EOAseries{Proceedings}
\begin{document}
The purpose of the first line is to embed the macros and commands that are defined in the preamble. The command \EOAbibliographytype in the second line defines what kind of bibliography is being created. Use {monograph} for one large bibliography at the end of the publication or {anthology} for one bibliography at the end of each chapter. The command \EOAseries may contain one keyword (Studies, Sources, Proceedings or Textbooks). It defines the dimensions of the book and may alter various options. The command \EOAbibliographydatabase refers to the file containing the bibliographic database. In the example above, the command refers to the file biblio.bib.
The main text ends with the command
\end{document}
The title and author of the publication as well as other links like ISBN and frontmatter will be provided by the Edition Open Access Team before publishing.
Prerequisites & Typesetting
In general, the implemented procedure is independent of any computer platform, editor and program. The only prerequisite is that the authors have a basic LaTeX environment installed, which is available for all commonly used operating systems. We use XeLaTeX (which is part of the standard distribution of TeX) instead of pdflatex or latex. This enables us to type Unicode (UTF-8) and avoid the coding of non-ASCII-characters. This applies in particular to non-Latin scripts such as Classical Greek or Chinese. Furthermore, we use BibLaTeX, a complete reimplementation of BibTeX alongside with Biber. This enables us to accurately typeset bibliographies that include non-Latin scripts. All these programs are already included in the current releases and do not have to be downloaded separately.
Please note: This procedure requires the configuration of most editors (such as TeXShop, TeXWorks, BibDesk and JabRef). In general, you must use the command xelatex rather than pdflatex or latex. In addition, the command biber has to be used instead of bibtex. Typesetting the publication therefore requires the following commands:
- xelatex Main_TeX_File
- biber Main_TeX_File
- xelatex Main_TeX_File
The command makeindex is not used. The index is generated using the package *imakeidx* which is included in the preamble.
The current distribution of TeX (2013) is used for the time being. For Mac and Windows users, this is combined with a convenient working environment that runs on Mac systems OS X 10.6 or higher, or Windows Vista and later.
de/shortintroduction.1572962896.txt.gz · Last modified: 2019/11/05 15:08 by sszenti
Except where otherwise noted, content on this wiki is licensed under the following license: CC Attribution 4.0 International
